
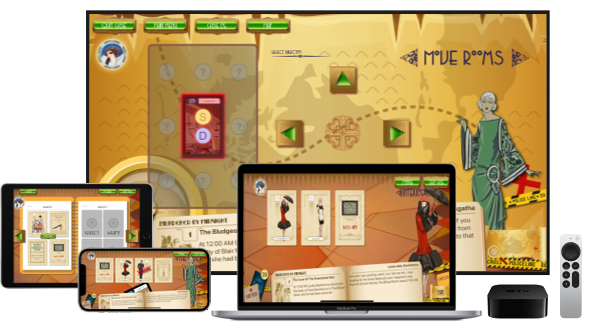
I recently decided to take my Murdered by Midnight Board Game and convert it to a Mobile App. After the success I had building my Stuff To Get shopping list app using Apple’s Multiplatform template in Xcode, it made me wonder if SwiftUI had matured enough to build something as complex as a casual game UI?
TL;DR Takeaway: Yes, SwiftUI in many ways made it easier to not only build the game UI/UX, but to have it render correctly on all the different iPhone, iPad, Mac and Apple TV models that I wanted to support. With several caveats and gotcha’s along the way, I was able to build and release the app in 3 months. Continue reading to find out how…
In this multipart article, I’ll point out the problems I discovered and how I worked around them. Hopefully, this will help out any other developer who decides to follow me down this rabbit hole. As I found some of this info very hard to find and I wanted to put it all in one place.
Index:
- Part 1 – Deals with converting a mockup to SwiftUI, handling different device sizes & screen ratios and displays screens as needed.
- Part 2 – Covers adding Game Center support to a SwiftUI app.
- Part 3 – Covers handling tvOS quirks in a SwiftUI app.
- Part 4 – Covers handling macOS Catalyst quirks in a SwiftUI app.
- Bonus Round – Covers handling Music, Sound Effects & Voice in a SwiftUI app.
Challenge 0 – Would This Even Work?
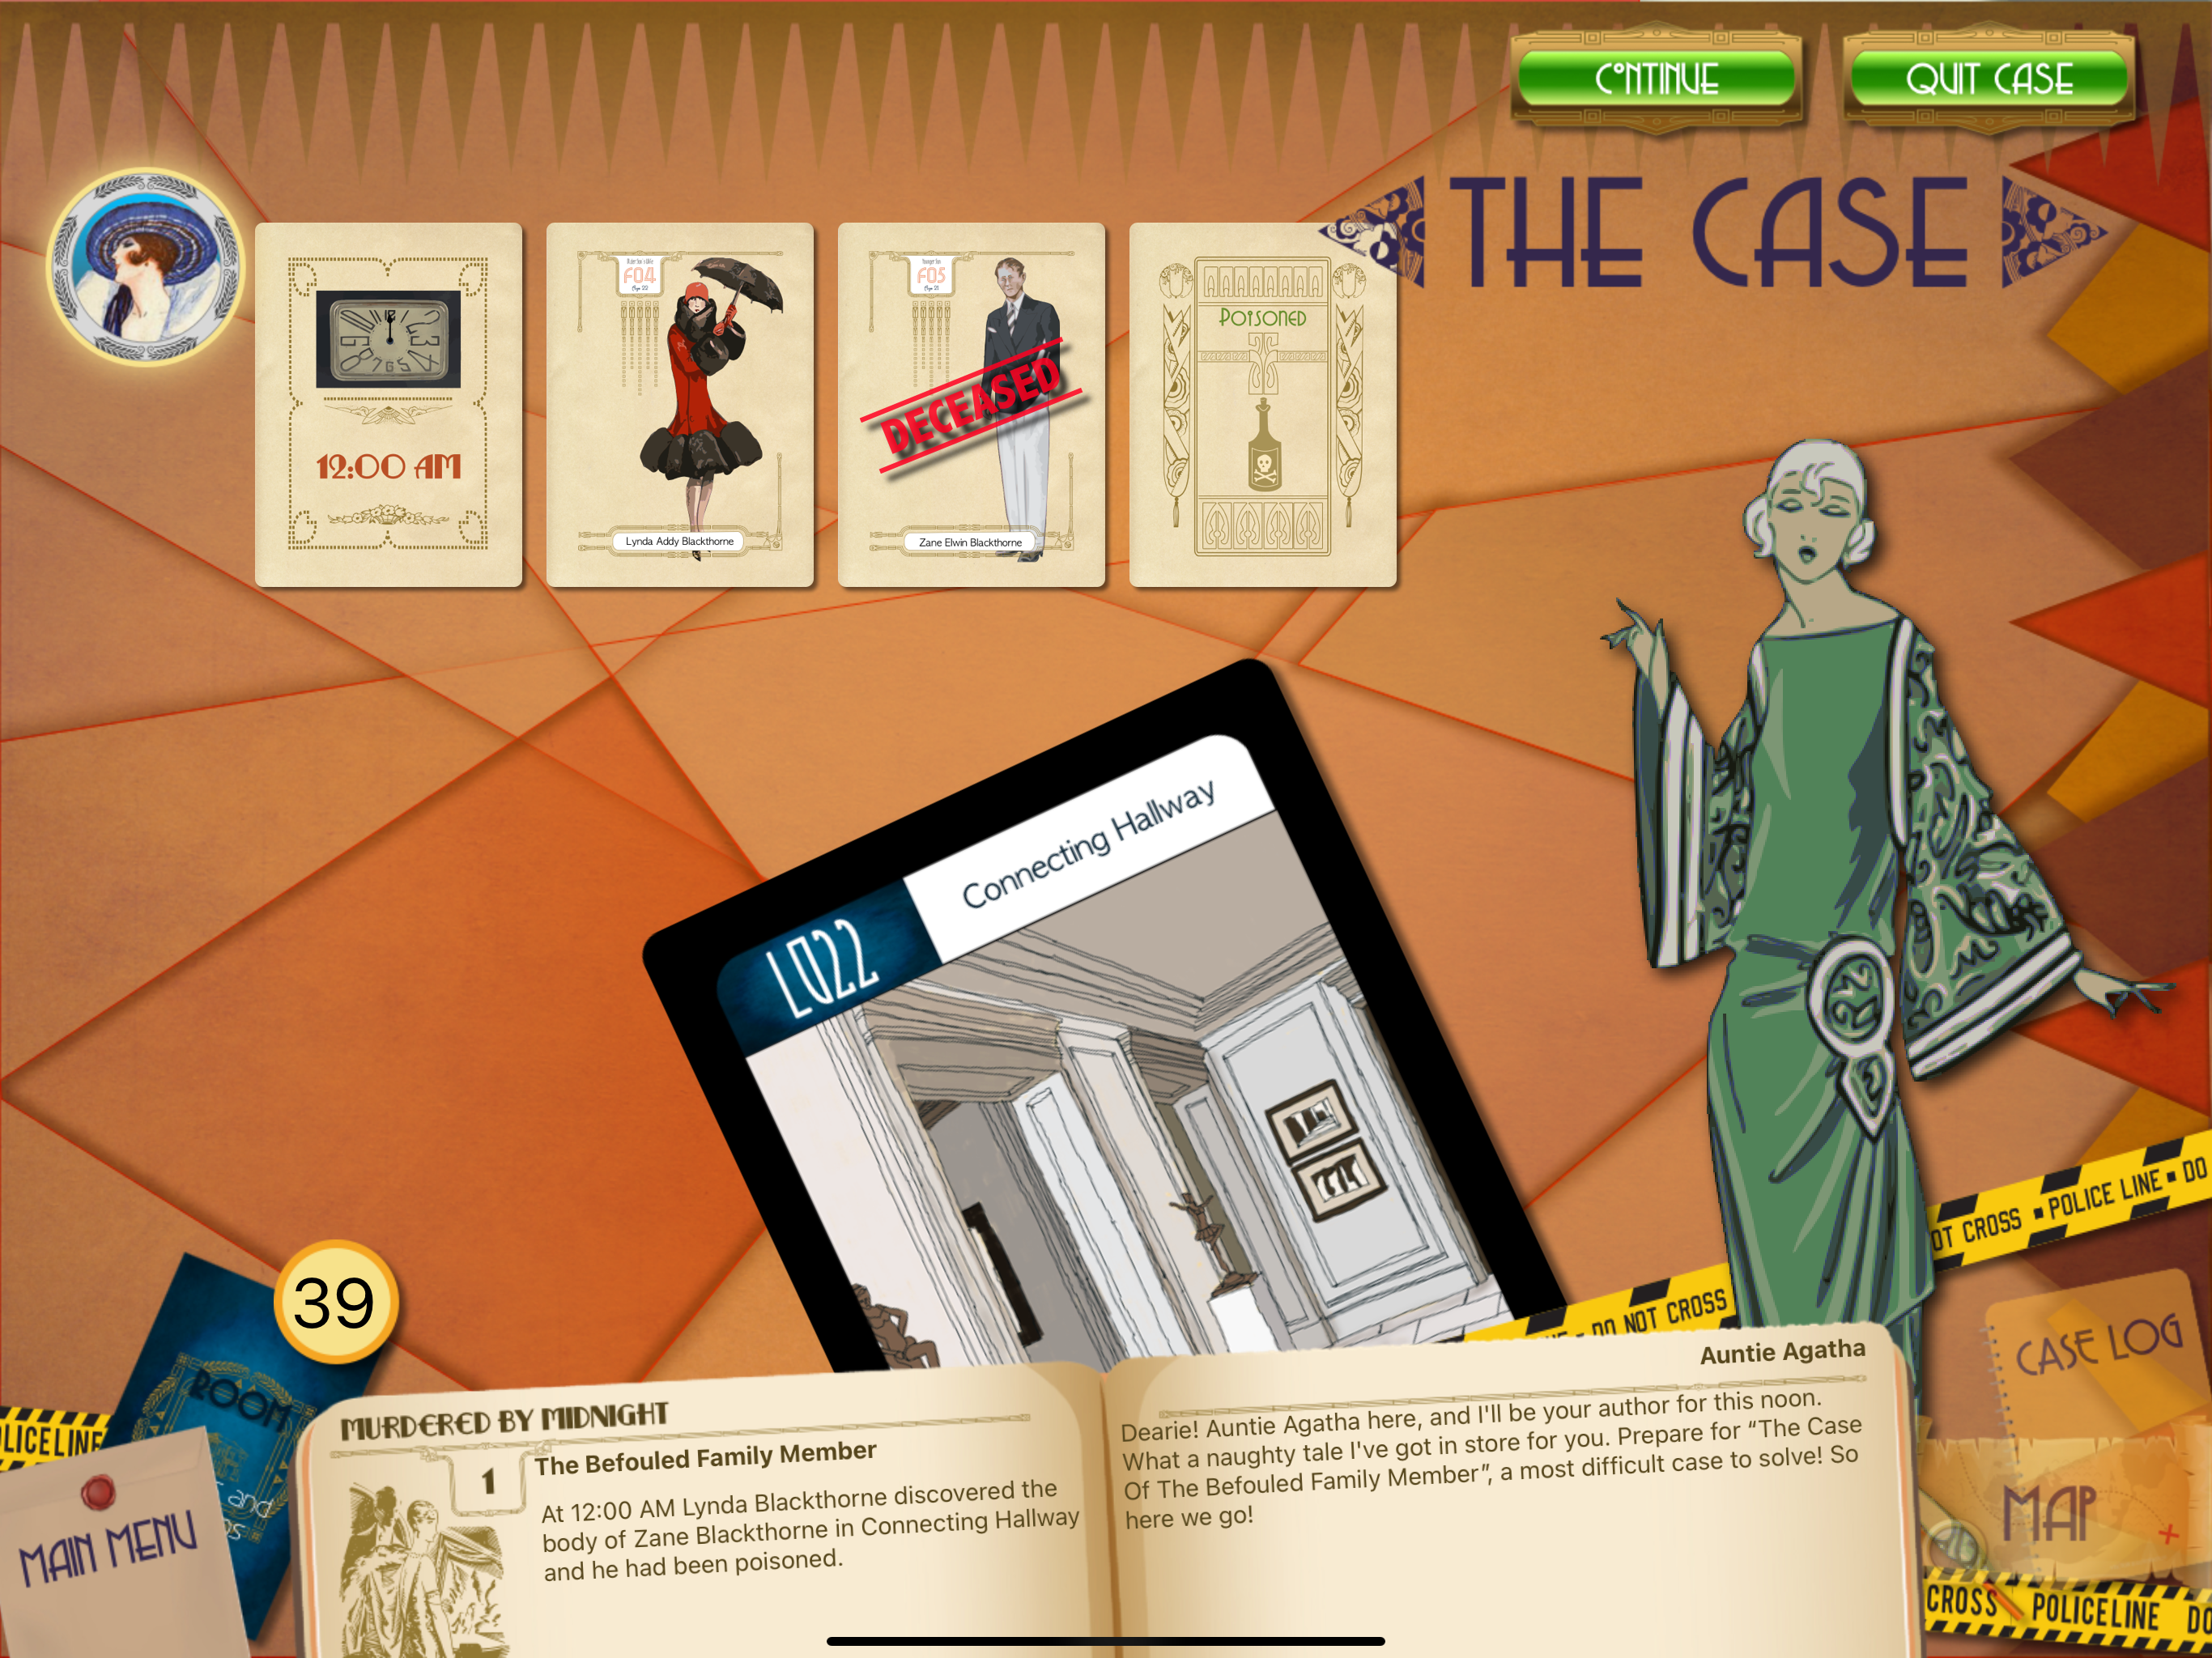
The very first questions was, “Would this even remotely work at all?” There was only one way to find out, mockup a screen and lay it out in SwiftUI. So that is exactly what I did. I created a complex game UI in Sketch, exported the individual pieces and generated a SwiftUI view that matched the mockup.
Here is the original mockup:
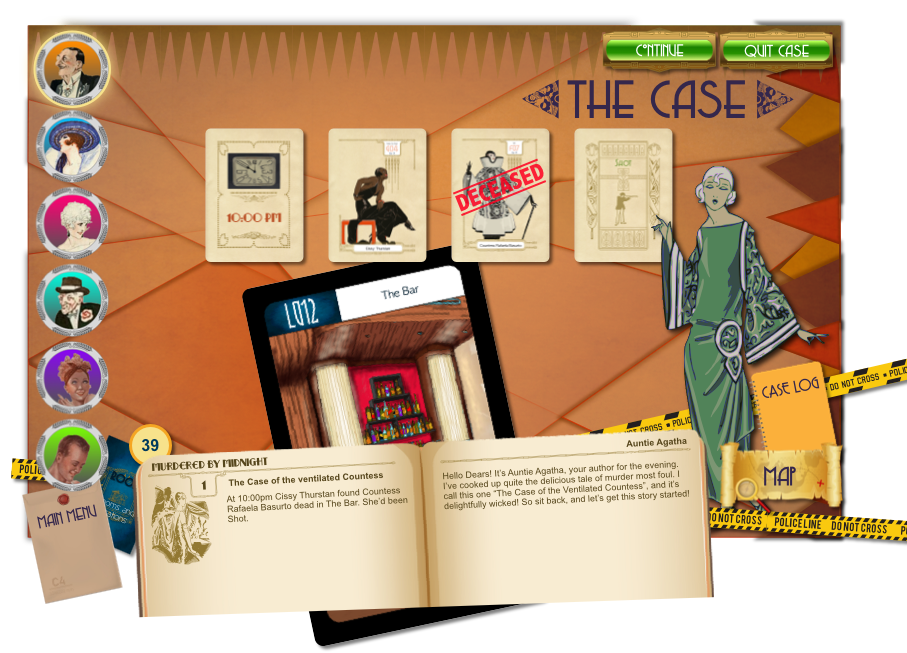
And here’s the same screen on the iPhone 12 Pro Max in SwiftUI:
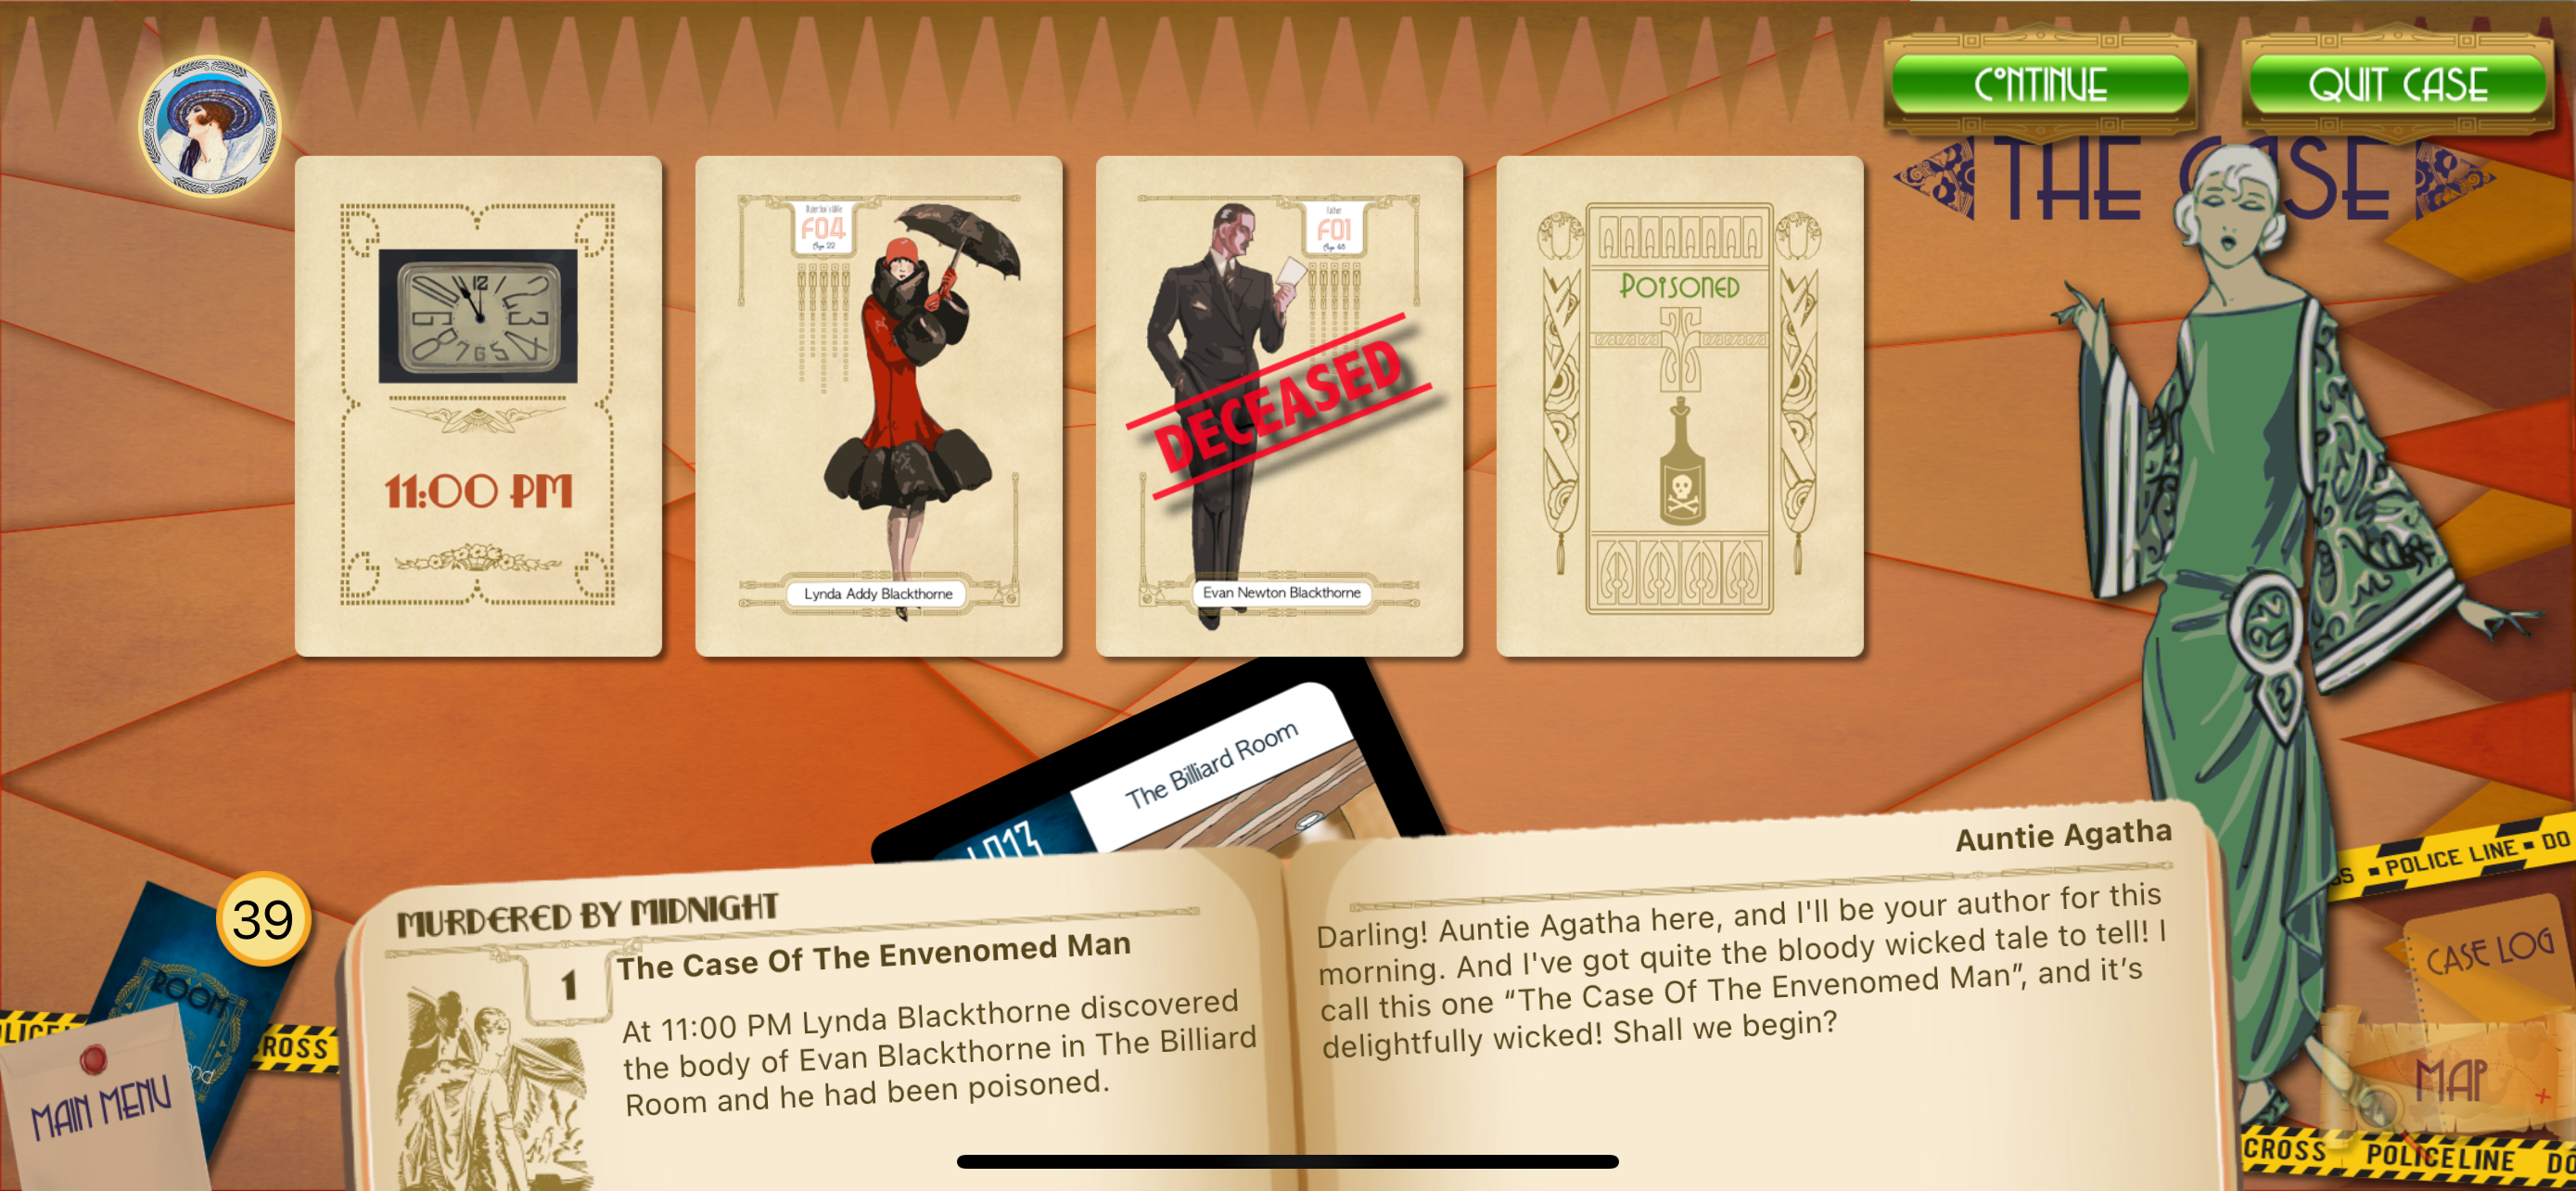
Pretty darn close, huh? To be honest, I expected this would fail spectacularly and I’d end up going the Storyboard and UIKit route. Let’s just say I was pleasantly surprised at how easy it was and how well it turned out.
Getting the Screen Size
That’s not to say I didn’t hit a few snags right off the bat. First, I knew I’d be layering the UI elements on top of each other, so I knew everything would be in a ZStack. I also knew I wanted the UI to fill the entire screen area so .ignoresSafeArea() would also be used too.
But I needed a way to get the current screen size of each device the app was running on so I could calculate where to place items on the screen and how to scale each item. After much digging on the internet, I discovered the GeometryReader that allowed me to do just what I needed. For example:
@ViewBuilder
private func mainBody() -> some View {
    GeometryReader { geometry in
        ZStack(alignment: .topLeading) {
            Image("MainGameBoard")
                .resizable()
                .frame(width: geometry.size.width, height: geometry.size.height, alignment: .top)
                .ignoresSafeArea()

            RoomView(roomName: dataStore.currentCase.bodyDiscoveredRoom, scale: scaleFactor)
                .frame(width: geometry.size.width, height: geometry.size.height, alignment: .bottom)
                .ignoresSafeArea()
                .offset(x: -80, y: 100)
                .rotationEffect(.degrees(-25))

            ...
        }
        .ignoresSafeArea()
    }
    .ignoresSafeArea()
}
The first Image is the main background which I’m stretching to fill the entire screen using the GeometryReader‘s width and height. The second item I’m showing here is a custom SwiftUI View that I named RoomView. It allowed me to take the logic for displaying a “Room Card” at a specific scaleFactor (a number from 0.0 to 1.0) and use it on multiple game views.
I’ll go into more details on scaling and placing elements later.
Divide and Conquer
This brings me to the next point, I didn’t try to do the whole screen at once, I broke it into manageable smaller chunks that were easy to get “just right” using SwiftUI’s Previews and Xcode 13’s Canvas. For example, RoomView above is quite simple:
import SwiftUI

struct RoomView: View {
    var roomName = "Map002"
    var scale:Float = 0.5

    var body: some View {
        Image(roomName)
            .resizable()
            .frame(width: CGFloat(506.0 * scale), height: CGFloat(761.0 * scale))
    }
}

struct RoomView_Previews: PreviewProvider {
    static var previews: some View {
        RoomView()
#if os(iOS)
    .previewInterfaceOrientation(.landscapeRight)
#endif
    }
}
In this case the “room” is an image of game “Room Card” measuring 506 x 761 pixels. I could have written code to read these dimensions from the image, however since it never changes, I just hard coded it.
Additionally, this allowed me to provide “syntactic sugar” and make “cleaner/clearer” code wherever I consumed this view. It also allowed me to reuse the Room Card wherever I needed while still giving one place to maintain it.
The First Gotcha!
And this brings me to the first gotcha. Because of the nature of my game’s UI, I’m locking the display to landscape. I also wanted my SwiftUI previews to be in landscape, hence my use of .previewInterfaceOrientation(.landscapeRight) above.
That said, notice how I’ve wrapped .previewInterfaceOrientation in conditional compilation statements? Since this code is also being compiled for macOS and tvOS build targets, it would blow up without it. Because neither platform supports interface orientation, the .previewInterfaceOrientation doesn’t exists on those OSes.
To further complicate matters, I ended up compiling the iOS version as a Mac Catalyst Appbecause: a) it was rendering as a total mess on Mac, b) it’s a game UI so it could be a bit funky on Mac and still be “passable”. And the first time I went to compile for macOS, boom!
Mac Catalyst Apps are compiled using the iOS version of the code so my conditional #if os(iOS) was being met, yet macOS still doesn’t contain .previewInterfaceOrientation resulting in hundreds of compiler errors.
I never found a good, clean solution so I just started commenting and uncommenting the .previewInterfaceOrientation statements as needed.
I guess I could have extended view and added a “shim” implementation of .previewInterfaceOrientation that did nothing or used some other technique, but that was more effort than my tight release schedule allowed for.
Challenge 1 – Many Screen Sizes and Aspect Ratios
I was designing my app to run on any device supported by iOS 15, iPadOS 15 and tvOS 15. This meant many different screen sizes and many different aspect ratios. For an idea of the complexity, take a look at the following two charts:
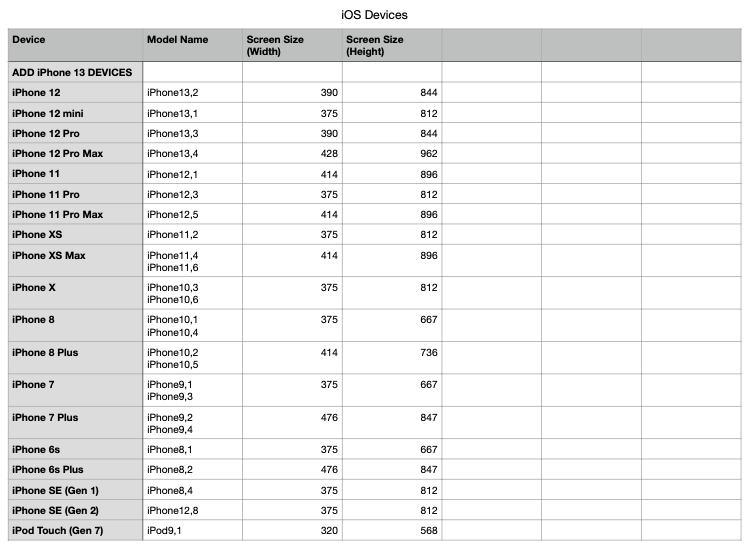
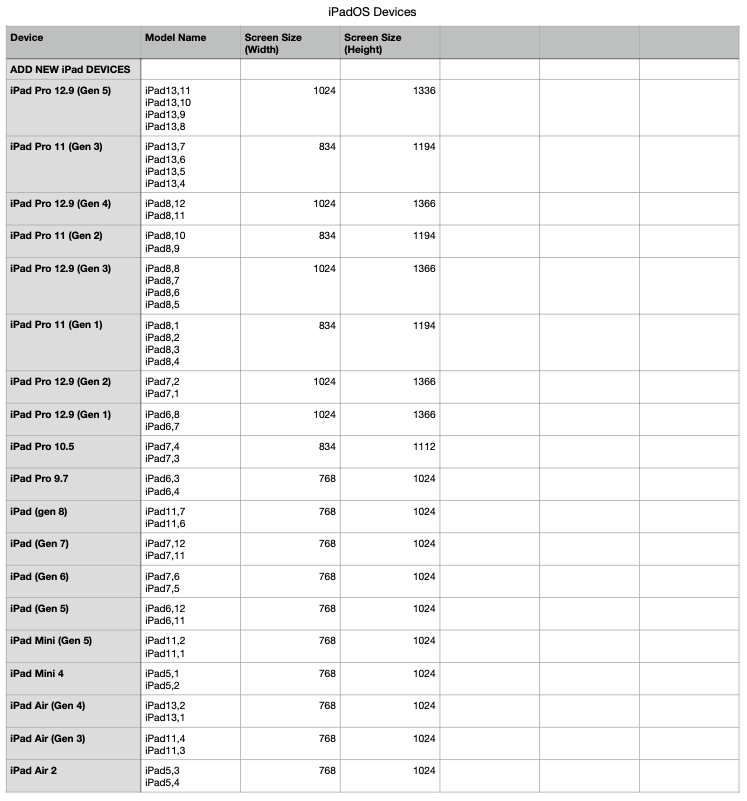
That’s just the iOS and iPadOS device, not including macOS and tvOS. And it’s not just size, it also ratio. Look at these two screenshots:
The iPhone is more rectangular and the iPad more square. So the elements and text not only had to change size, but also distribution and placement. If I just resized the screen to fit, the UI would have been squished or stretched in the X and/or Y axis.
I handled this by running the App on each device supported, displaying the devices Model Number and writing tweaks against each model in a switch statement until the screen looked “just right” on that device.
This really wasn’t as bad as it sounds and it did produce the results that I wanted. However, I later realized that many of the devices used the exact same screen sizes and I was overly bloating the code with the individual Model Numbers.
What I ended up doing in the end was including my open source SwiftletUtilities Library and extending it to create a unique “key” for the screen sizes:
import Foundation
import CoreImage
import UIKit
import SwiftletUtilities

extension HardwareInformation {

    public static var deviceDimentions:String {
        let screenSize: CGRect = UIScreen.main.bounds

        let screenWidth = Int(screenSize.width)
        let screenHeight = Int(screenSize.height)

        return "\(screenWidth)x\(screenHeight)"
    }
}
Using this I created a static class to hold all of the dimensional tweaks:
import Foundation
import SwiftUI
import SwiftletUtilities

class ScreenMetrics {

    // MARK: - Static Properties
    static var isiOSAppOnMac:Bool {
        //if #available(iOS 14.0, *) {
        return ProcessInfo.processInfo.isMacCatalystApp
        //}
        //return false
    }

    static var scaleFactor:Float {
        let model = HardwareInformation.deviceDimentions

        switch(model) {
        case "568x320":
            return 0.35
        case "667x375":
            return 0.4
        case "736x414":
            return 0.4
        case "896x414":
            return 0.4
        case "812x375":
            return 0.4
        case "844x390":
            return 0.4
        case "926x428":
            return 0.4
        case "1024x768":
            return 0.7
        case "1133x744":
            return 0.7
        case "1080x810":
            return 0.7
        case "1180x820":
            return 0.8
        case "1194x834":
            return 0.8
        case "1366x1024":
            return 0.90
        default:
            if HardwareInformation.isPhone {
                return 0.30
            } else if isiOSAppOnMac {
                return 1.0
            } else {
                return 1.0
            }
        }
    }

    static var topPadding:CGFloat {
        if isiOSAppOnMac {
            return CGFloat(30.0)
        } else {
            return CGFloat(0.0)
        }
    }

    static var buttonScale:Float {
        let model = HardwareInformation.deviceDimentions

        switch(model) {
        case "667x375":
            return 0.4
        case "736x414":
            return 0.4
        case "896x414":
            return 0.5
        case "812x375":
            return 0.5
        case "844x390":
            return 0.5
        case "926x428":
            return 0.5
        case "1024x768":
            return 0.7
        default:
            if HardwareInformation.isPhone {
                return 0.30
            } else if isiOSAppOnMac {
                return 1.0
            } else {
                return 0.80
            }
        }
    }

    ...
}
Note the scaleFactor used in my very first code example above. This was then consumed by each of the game views:
import SwiftUI
import SwiftletUtilities
import GameKit

struct CaseView: View {
    @ObservedObject var dataStore = MasterDataStore.sharedDataStore

    var scaleFactor:Float {
        return ScreenMetrics.scaleFactor
    }

    var buttonScale:Float {
        return ScreenMetrics.buttonScale
    }

    var fontSize:Int {
        return ScreenMetrics.fontSize
    }

    var contentX:Float {
        return ScreenMetrics.contentX
    }

    var contentY:Float {
        return ScreenMetrics.contentY
    }

    var charScale:Float {
        return ScreenMetrics.charScale
    }

    var cardScale:Float {
        return ScreenMetrics.cardScale
    }

    ...

    @ViewBuilder
    private func mainBody() -> some View {
        GeometryReader { geometry in
            ZStack(alignment: .topLeading) {
                Image("MainGameBoard")
                    .resizable()
                    .frame(width: geometry.size.width, height: geometry.size.height, alignment: .top)
                    .ignoresSafeArea()

                RoomView(roomName: dataStore.currentCase.bodyDiscoveredRoom, scale: scaleFactor)
                    .frame(width: geometry.size.width, height: geometry.size.height, alignment: .bottom)
                    .ignoresSafeArea()
                    .offset(x: -80, y: 100)
                    .rotationEffect(.degrees(-25))

                ...


//                Text("Hardware \(HardwareInformation.modelName)")
//                    .foregroundColor(Color.white)
            }
            .ignoresSafeArea()
        }
        .ignoresSafeArea()
    }
}
Which allowed me to both scale and move individual elements around the screen in a predictable way, no matter what device I was running on. I moved the tweaks into properties on the individual views to keep the code cleaner below and so I could override the common, shared values as needed on a view by view basis.
Challenge 2 – Displaying the Game Screens as Needed
Because of the nature of my game’s UI, I didn’t want to display the individual views in a Navigation Stack for two main reasons: a) several of the screens can be displayed in any order and they bounce around a lot, b) SwiftUI still kind of sucks at programmatically displaying and dismissing views in the stack.
I handled this by creating an enum to hold the desired destination view:
enum GameView {
    case startNewGameView
    case caseView
    case solveCaseView
    case investigateView
    case forensicsView
    case interrogationView
    case moveView
    case mapView
    case logView
    case weaponSearchView
    case tokenSelector
    case settingsView
    case multiplayerMatchmakingView
    case multiplayerLobby
    case dossierView
    case boardGameView
    case aboutView
    case howToPlayView
}
Using a property and function on my global, shared dataStore to hold the current view:
import Foundation
import GameKit
import SwiftUI
import SwiftletUtilities
import SwiftletData

class MasterDataStore: ObservableObject {

    // MARK: - Static Properties
    /**
     Holds a common, shared instance of the Master Data Store that is available globally throughout the app.
     */
    public static let sharedDataStore = MasterDataStore()


    // MARK: - Properties
    @Published var currentView:GameView = .startNewGameView

    @Published var lastView:GameView = .startNewGameView

    ...

    // MARK: - Initializers
    required init() {

    }

    // MARK: - Functions
    func changeView(view:GameView) {

        // Ensure we are not already in the required view
        guard view != currentView else {
            return
        }

        switch(view) {
        case .investigateView:
            MasterDataStore.sharedDataStore.lastConversation = AuntieAgatha.shared.roomDescription()
        default:
            break
        }

        lastView = currentView
        currentView = view

        GKAccessPoint.shared.isActive = (GKLocalPlayer.local.isAuthenticated && view == .startNewGameView)
    }

    ...
}
And having the main entry point switch display based on this value:
import SwiftUI
import SwiftletUtilities
import SwiftletData
import CloudKit
import GameKit

@main
struct Murdered_by_MidnightApp: App {
    @ObservedObject var dataStore = MasterDataStore.sharedDataStore
    ...

    var body: some Scene {
        WindowGroup {
            switch(dataStore.currentView) {
            case .startNewGameView:
                StartGameView()
            case .tokenSelector:
                TokenSelectorView()
            case .caseView:
                CaseView()
            case .solveCaseView:
                SolveCaseView()
            case .investigateView:
                InvestigateView()
            case .forensicsView:
                ForensicsView()
            case .interrogationView:
                InterrogationView()
            case .moveView:
                MoveView()
            case .mapView:
                MapView()
            case .logView:
                CaseLogView()
            case .weaponSearchView:
                WeaponSearchView()
            case .settingsView:
                SettingsView()
            case .multiplayerMatchmakingView:
                MultiplayerMatchmaking()
            case .multiplayerLobby:
                MultiplayerLobby()
            case .dossierView:
                DossierView()
            case .boardGameView:
                BoardGameView()
            case .aboutView:
                AboutView()
            case .howToPlayView:
                HowToPlayView()
            }
        }
    }

    ...
}
Whenever I want to display a new view, I simply call the changeView function on the MasterDataStore:
import SwiftUI
import SwiftletUtilities
import GameKitUI
import GameKit

struct StartGameView: View {
    @ObservedObject var dataStore = MasterDataStore.sharedDataStore

    ...

    dataStore.changeView(view: .howToPlayView)

    ...
}
Support
If you find this useful, please consider making a small donation:

It’s through the support of contributors like yourself, I can continue to create useful articles like this one and continue build, release and maintain high-quality, well documented Swift Packages for free.
In Part 2
In part two I’ll cover including Game Center support in SwiftUI. Future parts, will cover the tweaks I had to make for Mac Catalyst and tvOS so stay tuned. You can find Part 2 here.