

NOTE: This article is an update and replacement of our original Building Cross-Platform Universal Frameworks using Swift article using the latest version of Swift and the Swift Package Manager.
In the time since the original article was written, Apple has made several improvements to the process that make it much easier to create a shareable Framework, Library, API or SDK that can support iOS, iPadOS, tvOS, watchOS and/or macOS.
This first part of our three part series on creating Universal Frameworks with the Swift Package Manager covers the steps Appracatappra uses to build Swift Packages that support sharing common code across Swift Projects and Apple OSes.
As I said in the original articles, there are several ways to achieve this goal with Swift in Xcode and there have been many articles already written on this subject. Mine is not the only way to achieve this goal and it might not be the best way but, it works for me. Hopefully, you can find my process useful as well.
Additionally, I found much of the information for this article scattered throughout the internet, so another point of this article is to pull it all together in one place. I’ll give credit and link back to the original source articles, so you can look at different ways of structuring your projects to fit your own needs.
Part one contains the following sections:
- The Swift Package Manager
- Creating a New Swift Package
- License Your Framework
- The Package File
- Adding code to Your Framework
- Adding Unit Tests to Your Framework
- Up Next
The Swift Package Manager
One of the biggest changes to the process is the maturity of the Swift Package Manager (SPM) and its full inclusion into Xcode. By creating a SPM Package, much of the complexity of setting up the Framework project is removed. I also find SPM Packages to be much easier to consume.
Another great feature of SPM Packages is the fact that a package can manage any dependancies that it has to other packages. So when a developer adds a give package to their project, any dependent packages are automatically included as well. Along with any dependancies that those packages might have.
Additionally, SPM Packages are versioned making it easy for a developer consuming a package to see its existing version and update to the latest version, as new versions become available.
What is the Swift Package Manager?
According to Apple,
Swift packages are reusable components of Swift, Objective-C, Objective-C++, C, or C++ code that developers can use in their projects. They bundle source files, binaries, and resources in a way that’s easy to use in your app’s project.
Xcode supports creating and publishing Swift packages, as well as adding, removing, and managing package dependencies. Its support for Swift packages is built on top of the open source Swift Package Manager project.
For more details, please see Apple’s Swift Packages documentation.
Why Should I use the Swift Package Manager over Another Dependency Manager?
So, at this point, you might be wondering why to use SPM over (or in addition to) another, more mature Dependency Manager such as CocoaPods or Carthage?
For me it comes down to two points:
- Supporting multiple dependency managers makes maintaining a library exponentially more complicated and time consuming.
- Since, the Swift Package Manager is integrated with Xcode 11 (and greater), it’s the easiest choice to support going further.
Your milage may vary, as I said at the start of the article, this is the way I like to share code across projects, so it might not be a perfect fit for you.
Creating a New Swift Package
Now that we have the basics of what the Swift Package Manager and Swift Packages are out of the way, let’s get started creating a Swift Package for a reusable Siri Shortcut Button that can be added to a iOS or iPadOS app that allow the user to manage a Shortcut for a feature of the app.
NOTE: At the time of the writing of this article, I’m using the Beta version of Xcode 13 and Swift 5.5 since it won’t be long before these versions are officially released by Apple. If you are using a slightly older version of Xcode or Swift, the process is nearly identical.
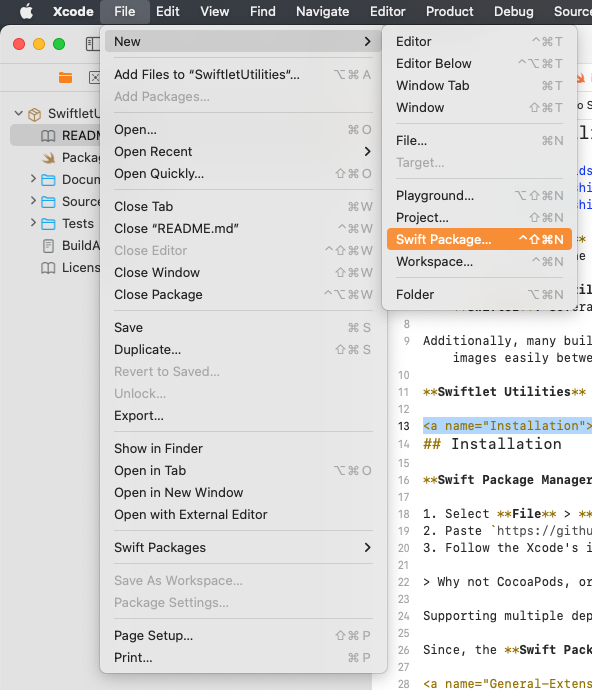
First, open Xcode and from the File menu select New > Swift Package…:
Next, select the location to build the package, enter the package name and click the Create button:
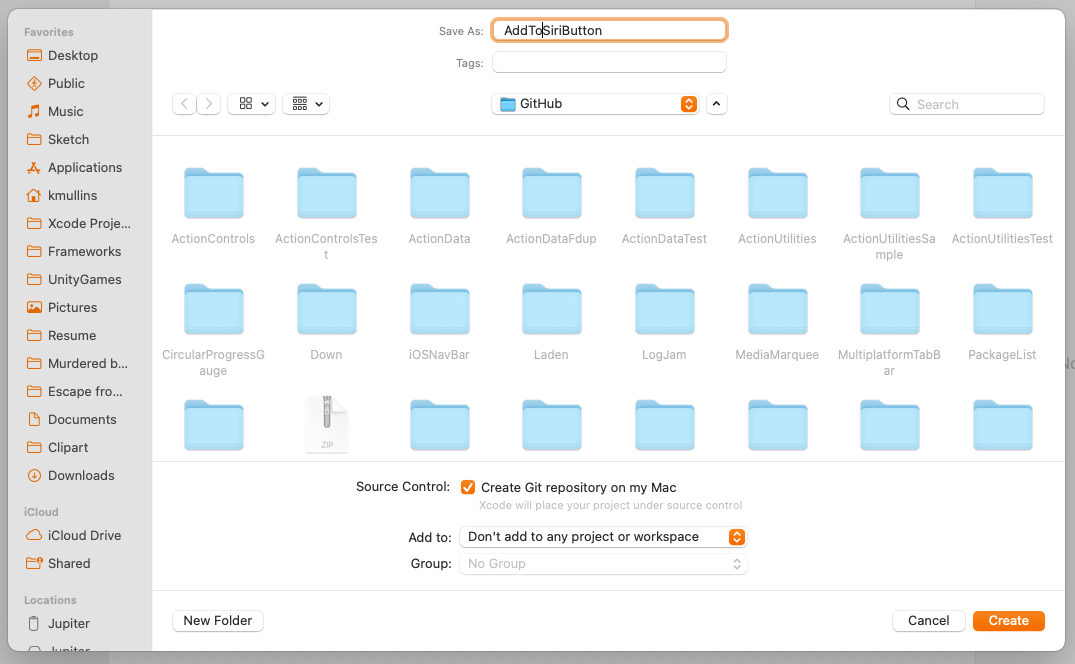
For our purposes, we’ll leave all of the options are their default values.
After the package is created, you’ll end up with the following structure:

Here’s what was created:
- README – A Markdown file that describes your Framework and gives the developer information about using your Framework.
- Package – Defines the Swift Package, its contents, the OSes it supports and any dependencies that the package might have.
- Sources/NameOfPackage – This is the directory and subdirectory that you will be adding all of your source code to.
- Tests/NameOfPackageTests – This is the directory and subdirectory that you will be adding all of your automated Unit Test to.
For the Frameworks that I create, I also like to add the following:
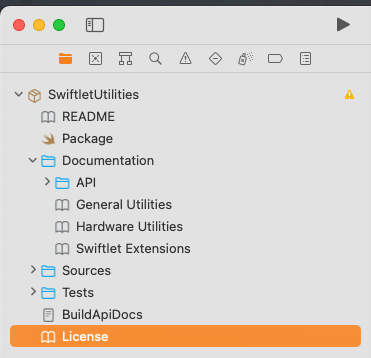
- Documentation – A directory to host any additional documentation that I want to add to the Framework along with API documentation that I will be generating using Jazzy. In the future I will be switching this to use DocC Apple’s new documentation system.
- BuildApiDocs – A Shell script that I use to make generating or regenerating Jazzy documentation easier.
- License – A Markdown file that defines the End User License for the Framework.
I’ll be covering these additions in greater detail below and in later parts of the series.
License Your Framework
This is a very important step for Frameworks that you will be releasing to other developer’s outside of your organization, as it tells the developer how your Framework can be used and any legal implications that will come from including your Framework in their project.
For example, if you are going to be releasing the Framework for free, the MIT License is a great option. Here’s the text from the one we use at Appracatappra:
# MIT License

Copyright © 2021 by [Appracatappra, LLC.](https://appracatappra.com)

--

Permission is hereby granted, free of charge, to any person obtaining a copy of this software and associated documentation files (the "Software"), to deal in the Software without restriction, including without limitation the rights to use, copy, modify, merge, publish, distribute, sublicense, and/or sell copies of the Software, and to permit persons to whom the Software is furnished to do so, subject to the following conditions:

The above copyright notice and this permission notice shall be included in all copies or substantial portions of the Software.

THE SOFTWARE IS PROVIDED "AS IS", WITHOUT WARRANTY OF ANY KIND, EXPRESS OR IMPLIED, INCLUDING BUT NOT LIMITED TO THE WARRANTIES OF MERCHANTABILITY, FITNESS FOR A PARTICULAR PURPOSE AND NONINFRINGEMENT. IN NO EVENT SHALL THE AUTHORS OR COPYRIGHT HOLDERS BE LIABLE FOR ANY CLAIM, DAMAGES OR OTHER LIABILITY, WHETHER IN AN ACTION OF CONTRACT, TORT OR OTHERWISE, ARISING FROM, OUT OF OR IN CONNECTION WITH THE SOFTWARE OR THE USE OR OTHER DEALINGS IN THE SOFTWARE.
The Package File
As I stated above, the Package file defines the Swift Package, its contents, the OSes it supports and any dependencies that the package might have.
For our example, here’s what the Package file looks like after it’s been created by Xcode:
// swift-tools-version:5.5
// The swift-tools-version declares the minimum version of Swift required to build this package.

import PackageDescription

let package = Package(
    name: "AddToSiriButton",
    products: [
        // Products define the executables and libraries a package produces, and make them visible to other packages.
        .library(
            name: "AddToSiriButton",
            targets: ["AddToSiriButton"]),
    ],
    dependencies: [
        // Dependencies declare other packages that this package depends on.
        // .package(url: /* package url */, from: "1.0.0"),
    ],
    targets: [
        // Targets are the basic building blocks of a package. A target can define a module or a test suite.
        // Targets can depend on other targets in this package, and on products in packages this package depends on.
        .target(
            name: "AddToSiriButton",
            dependencies: []),
        .testTarget(
            name: "AddToSiriButtonTests",
            dependencies: ["AddToSiriButton"]),
    ]
)
We’ll be making a few additions and modifications to this file for our example Framework below.
Define What OSes can Consume our Framework
First, let’s set the which OSes (and their versions) can consume our Framework. Our example Framework will only be available for iOS and iPadOS, so will add the following line just before the products line above:
...
	platforms: [.iOS(.v14)],
    products: [
...
This line says that the library can be used in any app targeting iOS (or iPadOS) version 14.0 and greater. If our Framework could be used on all of Apple’s OSes, we would have added a line that looks like the following:
...
	platforms: [.iOS(.v14), .macOS(.v11), .tvOS(.v14), .watchOS(.v7)],
    products: [
...
Define any Framework Dependencies
If the Framework that you are creating relies on any other packages to work, you’ll modify the dependencies section of the Package file to let the Swift Package Manager know that it will need to include these packages as well when your Framework is added to a project.
Our example Framework doesn’t have any dependencies so we’ll be leaving this section as-is.
For an example of what a decency looks like, here’s the section from our SwiftletData package that relies on our SwiftletUtilities package:
...
	dependencies: [
        // Dependencies declare other packages that this package depends on.
        .package(url: "https://github.com/Appracatappra/SwiftletUtilities.git", from: "1.0.0"),
    ],
...
It tells the SPM where to find the dependent package and the minimal version of the package required.
Defining the Files to Include in Your Framework
Lastly, we will need to define what needs to be included in the project and optionally, what notto include. For most Framework projects, you’ll not need to adjust this section.
Since we are include API documentation build with Jazzy, we’ll need to tell the SPM not to include those files in the resulting Swift Package.
Add the following to the targets section to tell the SPM to ignore anything in our Documentation directory:
...
	targets: [
        // Targets are the basic building blocks of a package. A target can define a module or a test suite.
        // Targets can depend on other targets in this package, and on products in packages this package depends on.
        .target(
            name: "AddToSiriButton",
            dependencies: [],
            exclude:["Documentation"]),
        .testTarget(
            name: "AddToSiriButtonTests",
            dependencies: ["AddToSiriButton"]),
    ]
...
The addition of exclude:["Documentation"] at the end of our .target definition accomplishes the desired task.
NOTE: This addition is required for the Swift Package to be consumed by the Swift Package Manager version 5.3 and lesser. SPM version 5.5 throws a warning on this line but can still consume the package correctly.
These changes and additions should cover most of your Frameworks needs. However, this just scratches the surface of what a Swift Package can do. For more information, please see Swift.org‘s Package Manager documentation.
Adding code to Your Framework
With all of the setup out of the way, we can add the source code (and any supporting content) that provides the functionality of our Framework. The example that we are building here allows us to create an Add To Siri Shortcut button to use in a SwiftUI project.
NOTE: At the time of the writing of this article, Apple hasn’t provided a built-in way to add the button to SwiftUI, so this library creates a wrapper around the
UIKitbutton. It’s based on code that came from this Reddit thread.
For our Framework, delete the AddToSiriButton Swift file that Xcode automatically added to the project and add a new SiriButtonView Swift file with the following code:
//
//  SiriButtonView.swift
//  Stuff To Get (iOS)
//
//  Created by Kevin Mullins on 6/24/21.
//  From: https://www.reddit.com/r/SwiftUI/comments/fhh1fw/add_to_siri_button_with_swiftui/
//

import SwiftUI
import Intents

/**
 Creates a **Siri Voice Shortcut Button** that can be displayed in SwiftUI.

 ## Example:
 ```swift
 // For an intent
 let intent = MyIntent()
 SiriButtonView(intent: intent)

 // For an existing Voice Shortcut
 SiriButtonView(voiceShortcut: myVoiceShortcut)
 ```
 */
struct SiriButtonView: UIViewControllerRepresentable {
    // MARK: - Properties
    /// The intent to show the button for
    var intent: INIntent? = nil

    /// The Voice Shortcut to show the button for.
    var voiceShortcut: INVoiceShortcut? = nil

    // MARK: - Functions
    /// Generates the `UIViewController` for the button
    /// - Parameter context: The context to generate the button in.
    /// - Returns: The `SiriShortcutViewController` for the `SiriButtonView`
    func makeUIViewController(context: Context) -> SiriShortcutViewController {
        let controller = SiriShortcutViewController()
        controller.intent = intent
        controller.voiceShortcut = voiceShortcut
        return controller
    }

    /// Updates the `UIViewController` for the button
    /// - Parameters:
    ///   - uiViewController: The view controller to update
    ///   - context: The context to update the button in.
    func updateUIViewController(_ uiViewController: SiriShortcutViewController, context: Context) {

    }
}
Now add a SiriShortcutViewController Swift file to the project with the following code:
//
//  SiriShortcutViewController.swift
//  Stuff To Get (iOS)
//
//  Created by Kevin Mullins on 6/24/21.
//  From: https://www.reddit.com/r/SwiftUI/comments/fhh1fw/add_to_siri_button_with_swiftui/
//

import UIKit
import Intents
import IntentsUI

/// Creates a Siri Shortcut View Controller that can be used within SwiftUI.
class SiriShortcutViewController: UIViewController {
    // MARK: - Properties
    /// The intent to generate the `INUIAddVoiceShortcutButton` for.
    var intent: INIntent? = nil

    /// The Voice Shortcut to generate the `INUIAddVoiceShortcutButton` for.
    var voiceShortcut: INVoiceShortcut? = nil

    // MARK: - Initializers

    /// Creates a new instance of the object.
    override func viewDidLoad() {
        super.viewDidLoad()
        addSiriButton(to: view)
    }

    // MARK: - Functions

    /// Adds the Siri Voice Shortcut Button to the given give
    /// - Parameter view: The view to add the button to.
    func addSiriButton(to view: UIView) {
        #if !targetEnvironment(macCatalyst)
        let button = INUIAddVoiceShortcutButton(style: .automaticOutline)
        button.translatesAutoresizingMaskIntoConstraints = false
        view.addSubview(button)
        view.centerYAnchor.constraint(equalTo: button.centerYAnchor).isActive = true
        view.leadingAnchor.constraint(equalTo: button.leadingAnchor).isActive = true
        view.trailingAnchor.constraint(equalTo: button.trailingAnchor).isActive = true
        setupShortcut(to: button)
        #endif
    }

    /// Configures the Vioce Shortcut for the button
    /// - Parameter button: The Siri Voice Shortcut Button to configure.
    func setupShortcut(to button: INUIAddVoiceShortcutButton?) {
        if let intent = intent {
            button?.shortcut = INShortcut(intent: intent)
            button?.delegate = self
        } else if let voiceShortcut = voiceShortcut {
            button?.shortcut = voiceShortcut.shortcut
            button?.delegate = self
        }
    }
}

/// Extends the `SiriShortcutViewController` to conform to the `INUIAddVoiceShortcutViewControllerDelegate` protocol.
extension SiriShortcutViewController: INUIAddVoiceShortcutViewControllerDelegate {

    /// Handles the Voice Shortcut button being dismissed.
    /// - Parameters:
    ///   - controller: The view controller
    ///   - voiceShortcut: The shortcut being handled.
    ///   - error: An error, if one exists else `nil`.
    func addVoiceShortcutViewController(_ controller: INUIAddVoiceShortcutViewController, didFinishWith voiceShortcut: INVoiceShortcut?, error: Error?) {
        controller.dismiss(animated: true, completion: nil)
    }

    /// Handles the Vioce Shortcut button being dismissed by the user.
    /// - Parameter controller: The view controller.
    func addVoiceShortcutViewControllerDidCancel(_ controller: INUIAddVoiceShortcutViewController) {
        controller.dismiss(animated: true, completion: nil)
    }
}

/// Extends the `SiriShortcutViewController` to conform to the `INUIAddVoiceShortcutButtonDelegate` protocol.
extension SiriShortcutViewController: INUIAddVoiceShortcutButtonDelegate {

    /// Presents the add shortcut button being presented to the user.
    /// - Parameters:
    ///   - addVoiceShortcutViewController: The view controller.
    ///   - addVoiceShortcutButton: The Voice Shortcut Button to present.
    func present(_ addVoiceShortcutViewController: INUIAddVoiceShortcutViewController, for addVoiceShortcutButton: INUIAddVoiceShortcutButton) {
        addVoiceShortcutViewController.delegate = self
        addVoiceShortcutViewController.modalPresentationStyle = .formSheet
        present(addVoiceShortcutViewController, animated: true, completion: nil)
    }

    /// Handles the edit shortcut button being presented to the user.
    /// - Parameters:
    ///   - editVoiceShortcutViewController: The view controller.
    ///   - addVoiceShortcutButton: The Voice Shortcut Button.
    func present(_ editVoiceShortcutViewController: INUIEditVoiceShortcutViewController, for addVoiceShortcutButton: INUIAddVoiceShortcutButton) {
        editVoiceShortcutViewController.delegate = self
        editVoiceShortcutViewController.modalPresentationStyle = .formSheet
        present(editVoiceShortcutViewController, animated: true, completion: nil)
    }
}

/// Extends the `SiriShortcutViewController` to conform to the `INUIEditVoiceShortcutViewControllerDelegate` protocol.
extension SiriShortcutViewController: INUIEditVoiceShortcutViewControllerDelegate {

    /// Handles the shortcut being updated.
    /// - Parameters:
    ///   - controller: The view controller.
    ///   - voiceShortcut: The voice shortcut being modified.
    ///   - error: An error, if one exists else `nil`.
    func editVoiceShortcutViewController(_ controller: INUIEditVoiceShortcutViewController, didUpdate voiceShortcut: INVoiceShortcut?, error: Error?) {
        controller.dismiss(animated: true, completion: nil)
    }

    /// Handles the shortcut being deleted
    /// - Parameters:
    ///   - controller: The view controller.
    ///   - deletedVoiceShortcutIdentifier: The id of the voice shortcut being deleted.
    func editVoiceShortcutViewController(_ controller: INUIEditVoiceShortcutViewController, didDeleteVoiceShortcutWithIdentifier deletedVoiceShortcutIdentifier: UUID) {
        controller.dismiss(animated: true, completion: nil)
    }

    /// Handles the user canceling the shortcut edit.
    /// - Parameter controller: The view controller.
    func editVoiceShortcutViewControllerDidCancel(_ controller: INUIEditVoiceShortcutViewController) {
        controller.dismiss(animated: true, completion: nil)
    }
}
The code and files that you’ll be adding will be dependent on the Framework that you are creating. The two files above are just a functional example.
Adding Unit Tests to Your Framework
Unit testing is an important part of ensuring that your Framework performs as designed and that future modifications perform as expected without breaking existing functionality.
NOTE: Unit Tests are also required for your Framework if you plan on releasing it to the Swift Package Index. The Swift Package Index uses your Unit Tests to report what OSes and version are supported.
For our example Framework, open up the AddToSiriButtonTests Swift file and change it to the following:
import XCTest
@testable import AddToSiriButton

final class AddToSiriButtonTests: XCTestCase {
    func testExample() throws {
        // This is an example of a functional test case.
        // Use XCTAssert and related functions to verify your tests produce the correct
        // results.
        let button = SiriButtonView()
        XCTAssertNotNil(button)
    }
}
For our example, we are just ensuring that a SiriButtonView can be created. For a real Framework, a deeper level of tests should be performed.
With all of the code and test in place, you should now be able to successfully build your Framework for all of OSes that it supports.
Support
If you find this useful, please consider making a small donation:

It’s through the support of contributors like yourself, I can continue to create useful articles like this one and continue build, release and maintain high-quality, well documented Swift Packages for free.
Up Next
The second part of the series, Documenting Your Swift Package , will cover the step required to properly document your Swift Package so any developer using your Framework knows how to properly implement it.
The third part of the series, Releasing and Versioning Your Swift Package, will cover to step to release your Swift Package on GitHub and how to set and maintain the version of the Framework.